We know that your LinkedIn outreach, connection and engagement strategy doesn’t exist in a vacuum.
For many, LinkedIn is just one aspect of a wider sales and marketing strategy and process - that incorporates other social media channels, email, digital events etc. All leading to the holy grail of a 360 degree view of your prospect that will help qualify who’s really interested and get you the sale.
Dux-Soup itself is moving in this more holistic direction with the launch of our new Funnel Flow LinkedIn lead management tool and the ability to now run multiple, concurrent LinkedIn campaigns.
But we know that, in addition to this, many of you want to bring your LinkedIn activity into an all encompassing CRM - both to direct your LinkedIn activity better and enrich your prospect data.
Salesforce is probably the best known cloud-based customer relationship management (CRM) service in the world. And guess what, with Dux-Soup Turbo you can set up your LinkedIn processes to integrate with Salesforce - so you can stay organised and keep track of your new connections and messages.
Cool eh!
In this blog, we will show you step by step how to set up Salesforce CRM with Dux-Soup Turbo using Zapier.
Specifically, we’ll show you how to:
So - keep on reading!
You will need to add new fields into Salesforce to assist with setting up an integration with Dux-Soup.
Here are the steps:
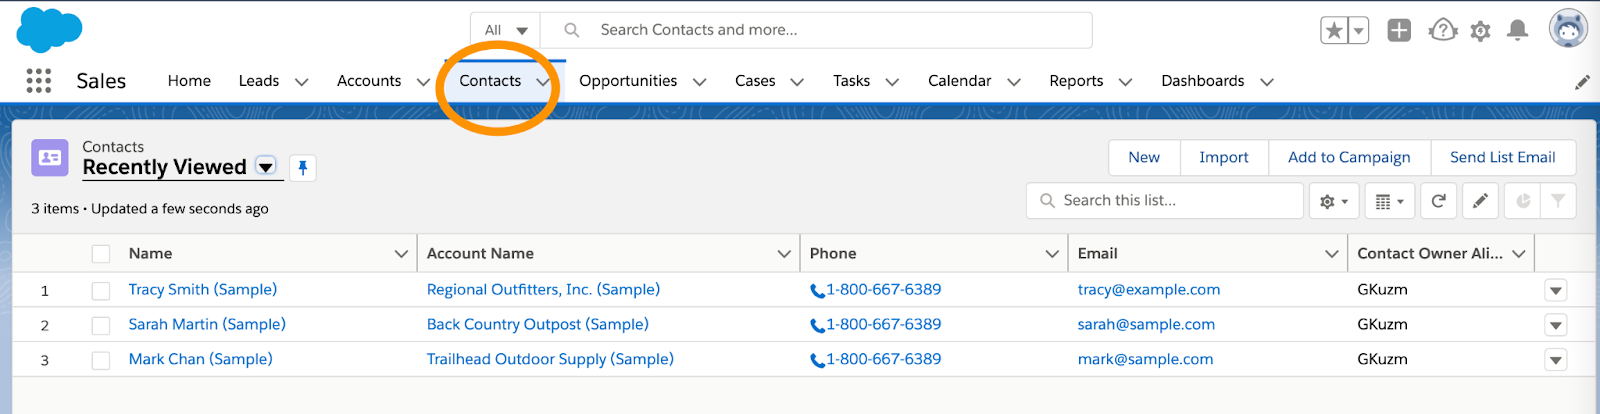
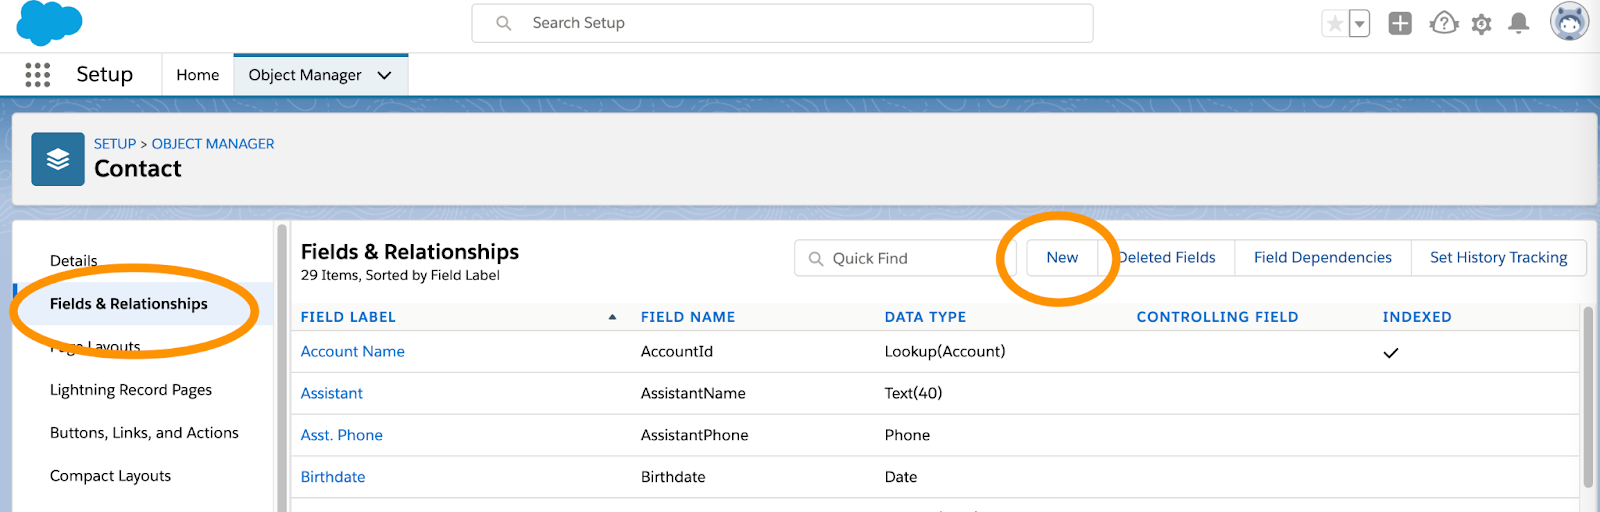
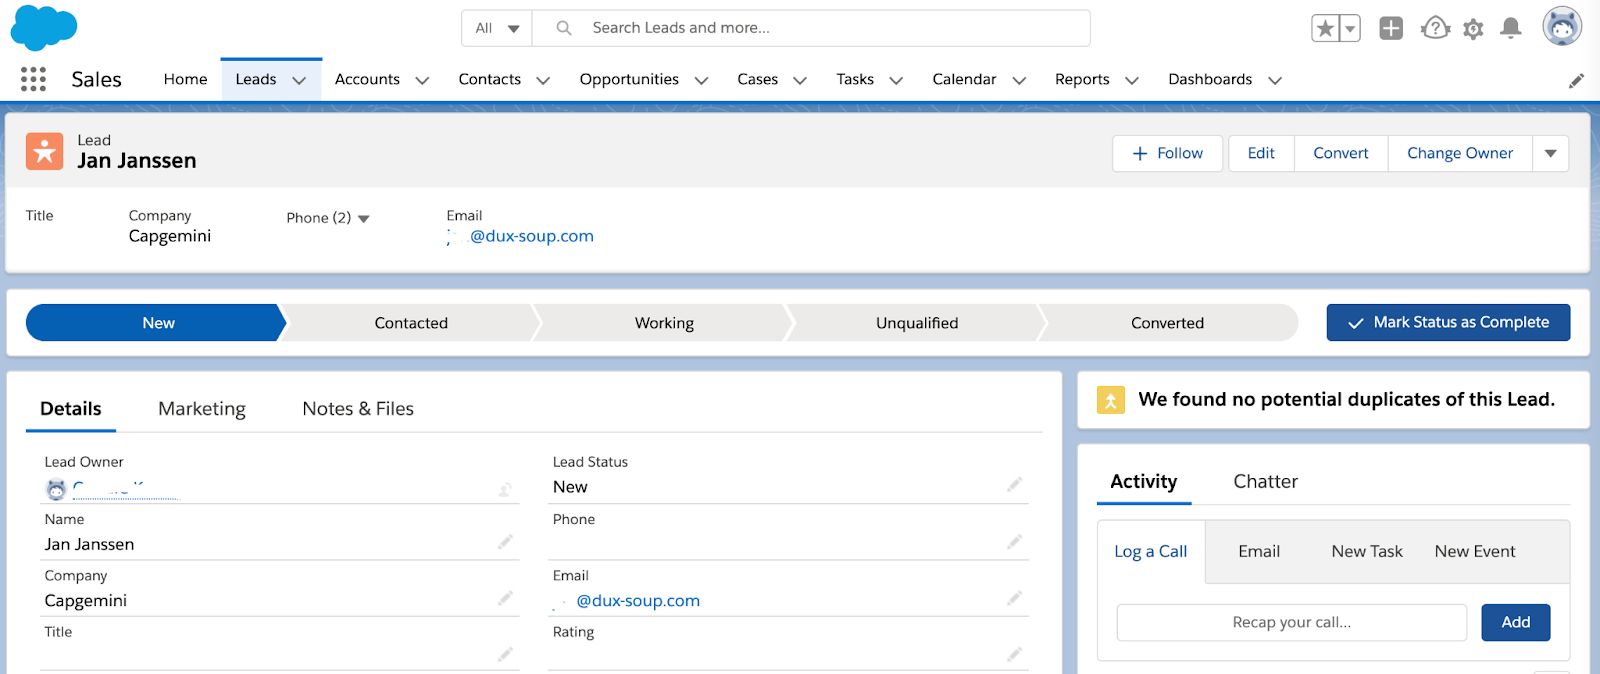
Logon to your Salesforce environment and go to Sales, Contacts so that you have your list of contacts on the screen:
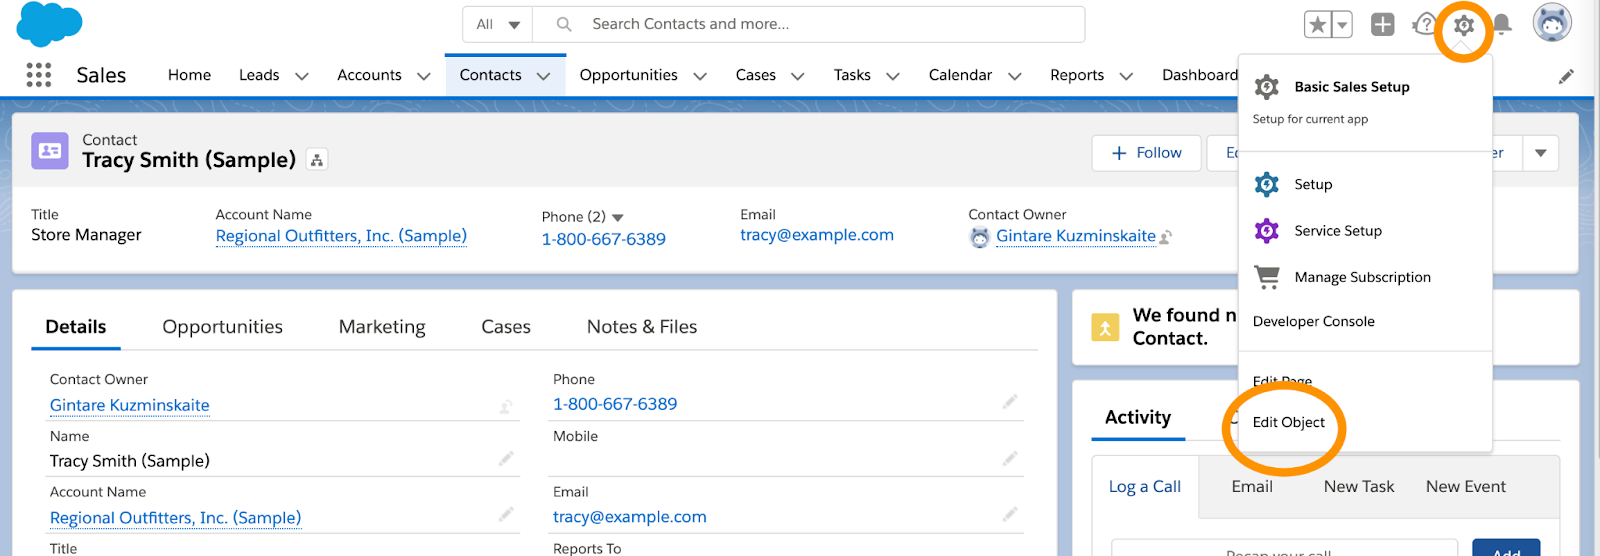
Open one of the contacts and in the top right hand corner, click on the Setup icon and select Edit Object:
This opens up a new tab where you can configure the fields that you require.
Go to Fields and Relationships on the left hand side and select New from the top right:
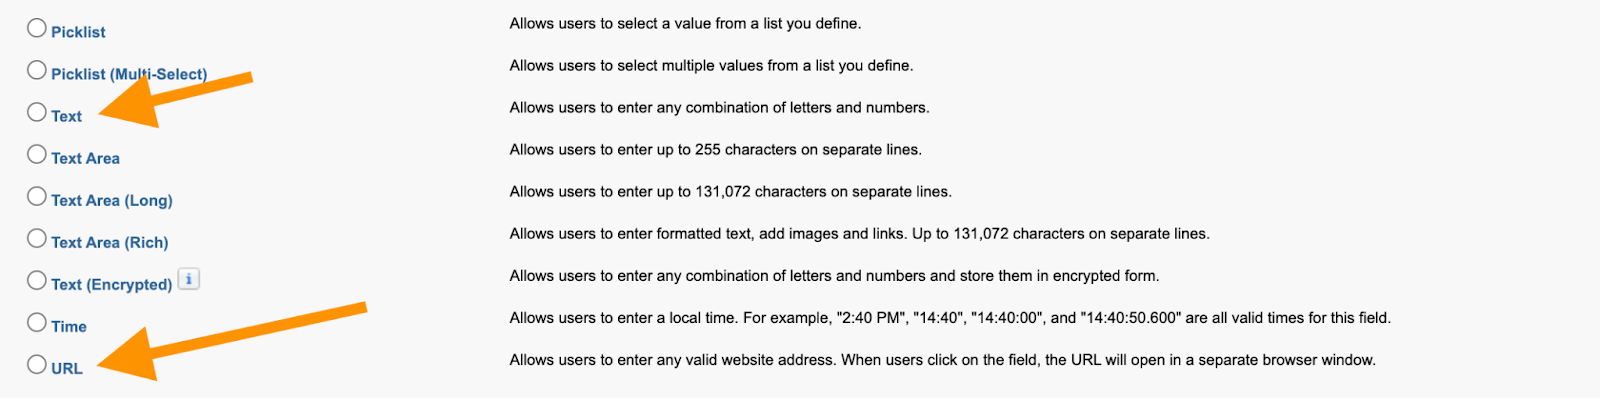
You will need to add 2 new custom fields:
- LinkedIn ID (select Text; maximum 20 characters)
- LinkedIn URL (select URL)
Press the Next button in the bottom right hand corner, provide the appropriate labels: LinkedIn ID or LinkedIn URL (note the Field Name populates automatically)
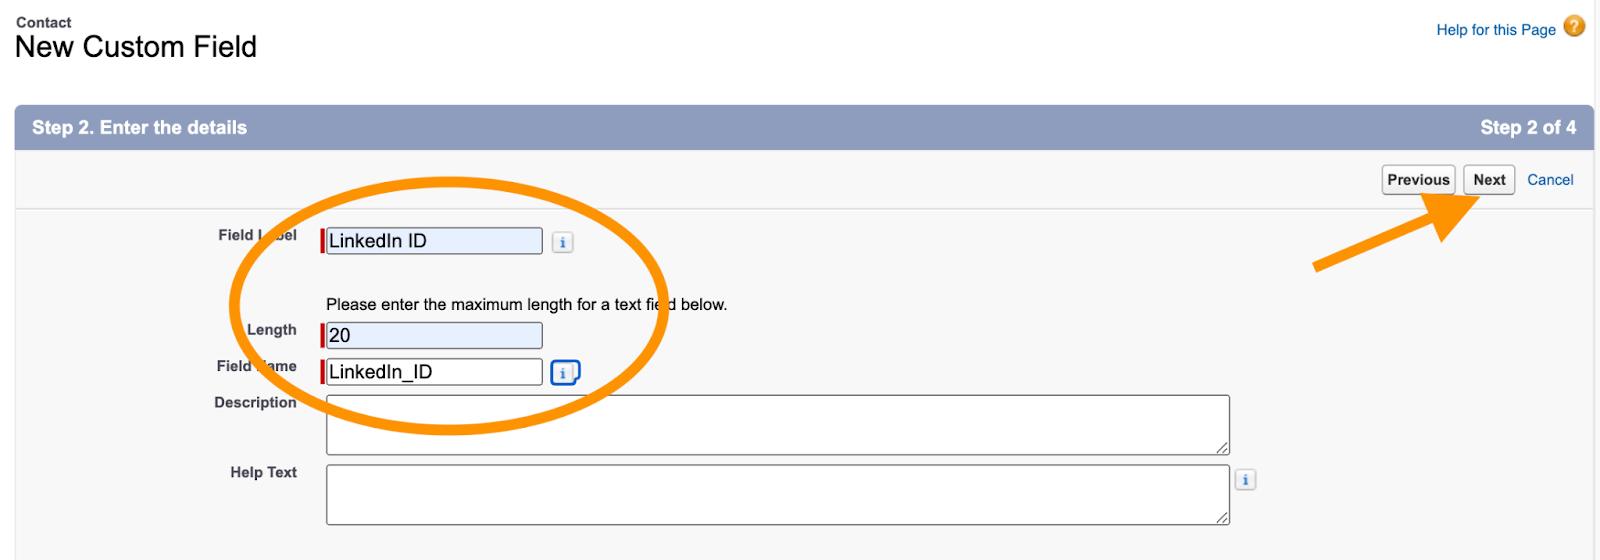
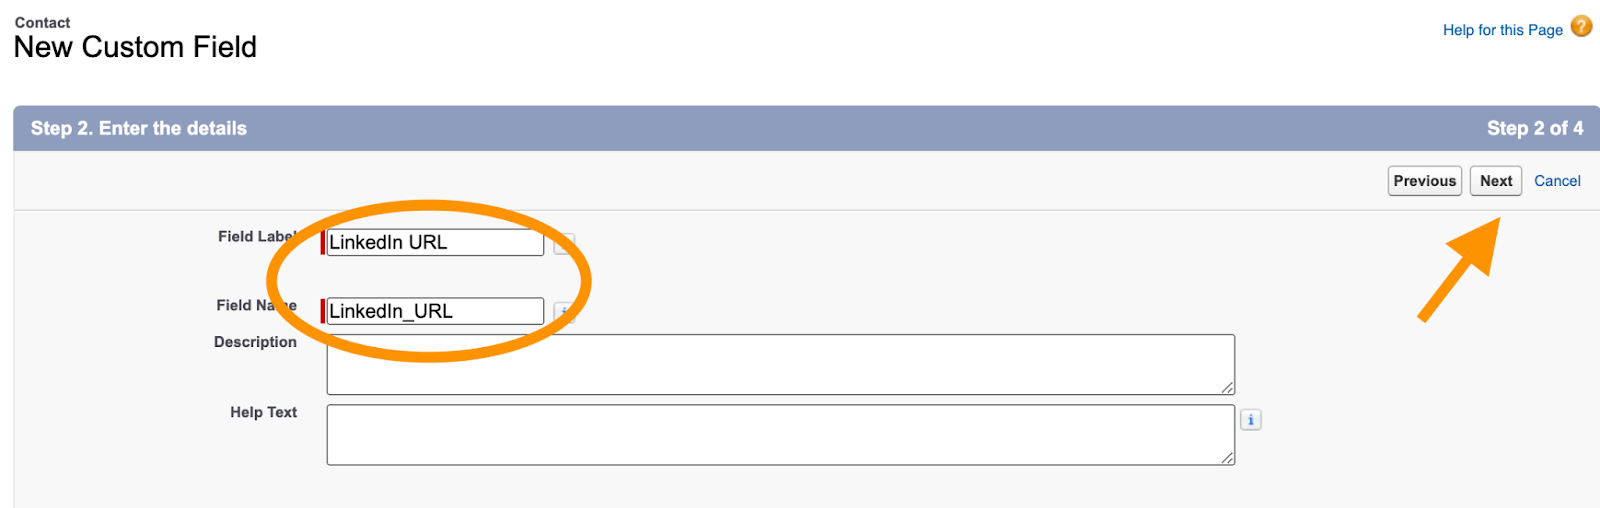
Press Next, confirm the security levels, press Next again chose to have the data added to your layouts and press Save.
Now your Salesforce account is ready to be linked with Dux-Soup Turbo.
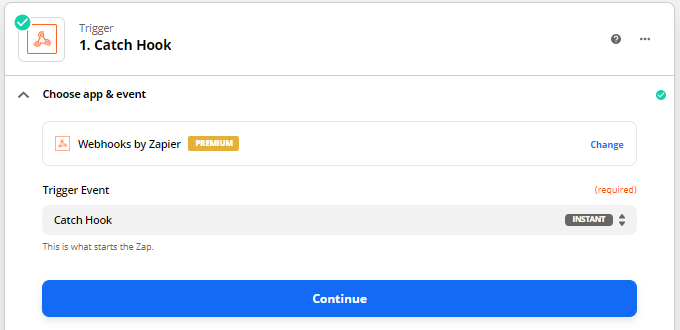
1. Make a new Zap and select Webhooks by Zapier as Trigger App and Catch Hook as Trigger Event:
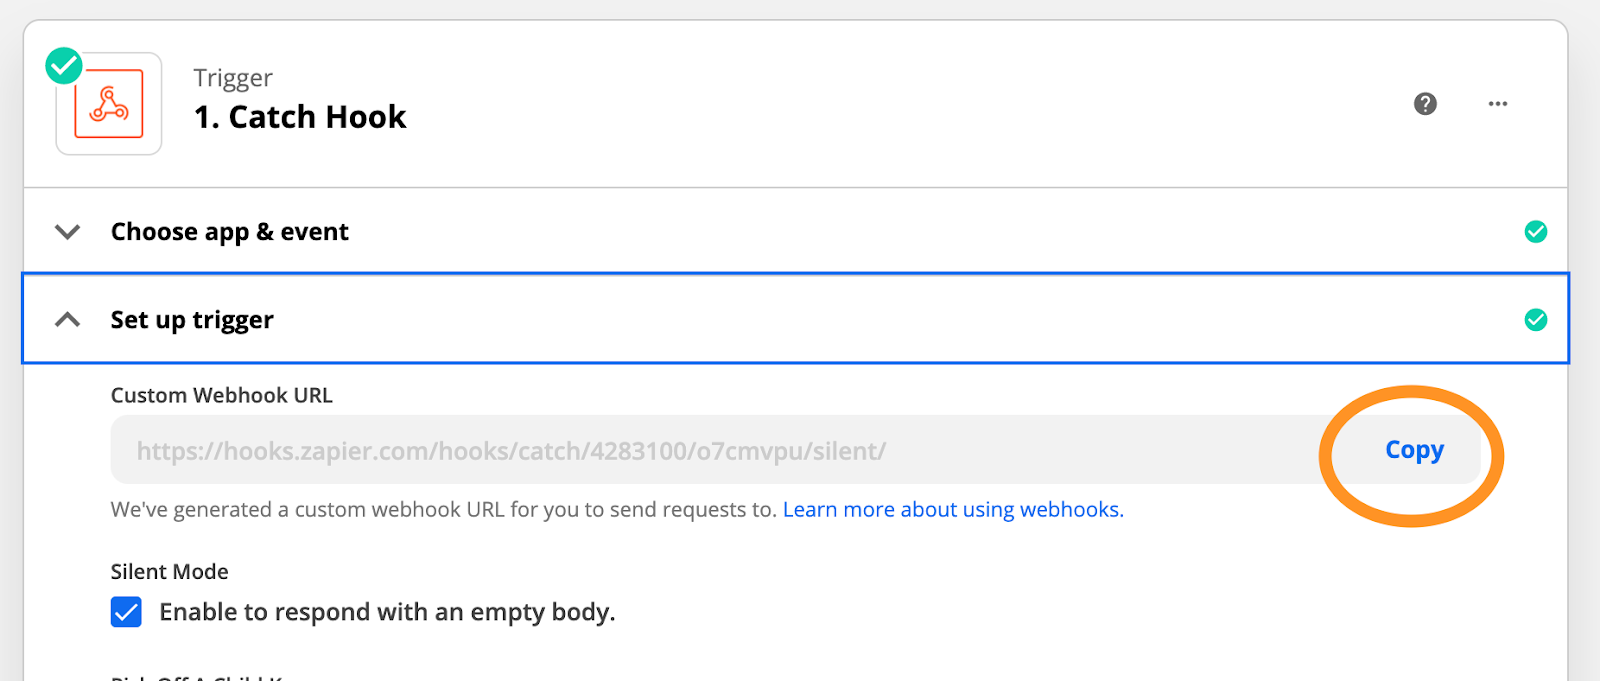
2. Copy your customized Webhook:
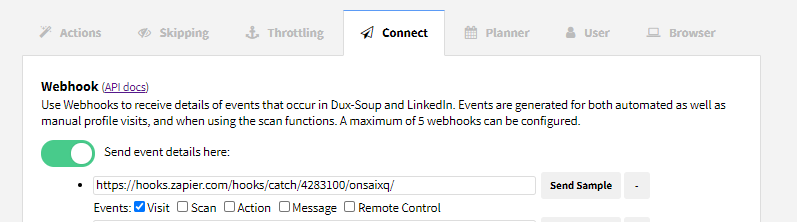
3. Paste it to Dux-Soup Options, Connect tab, make sure you have ticked only the "Visit" event and click on "Send Sample":
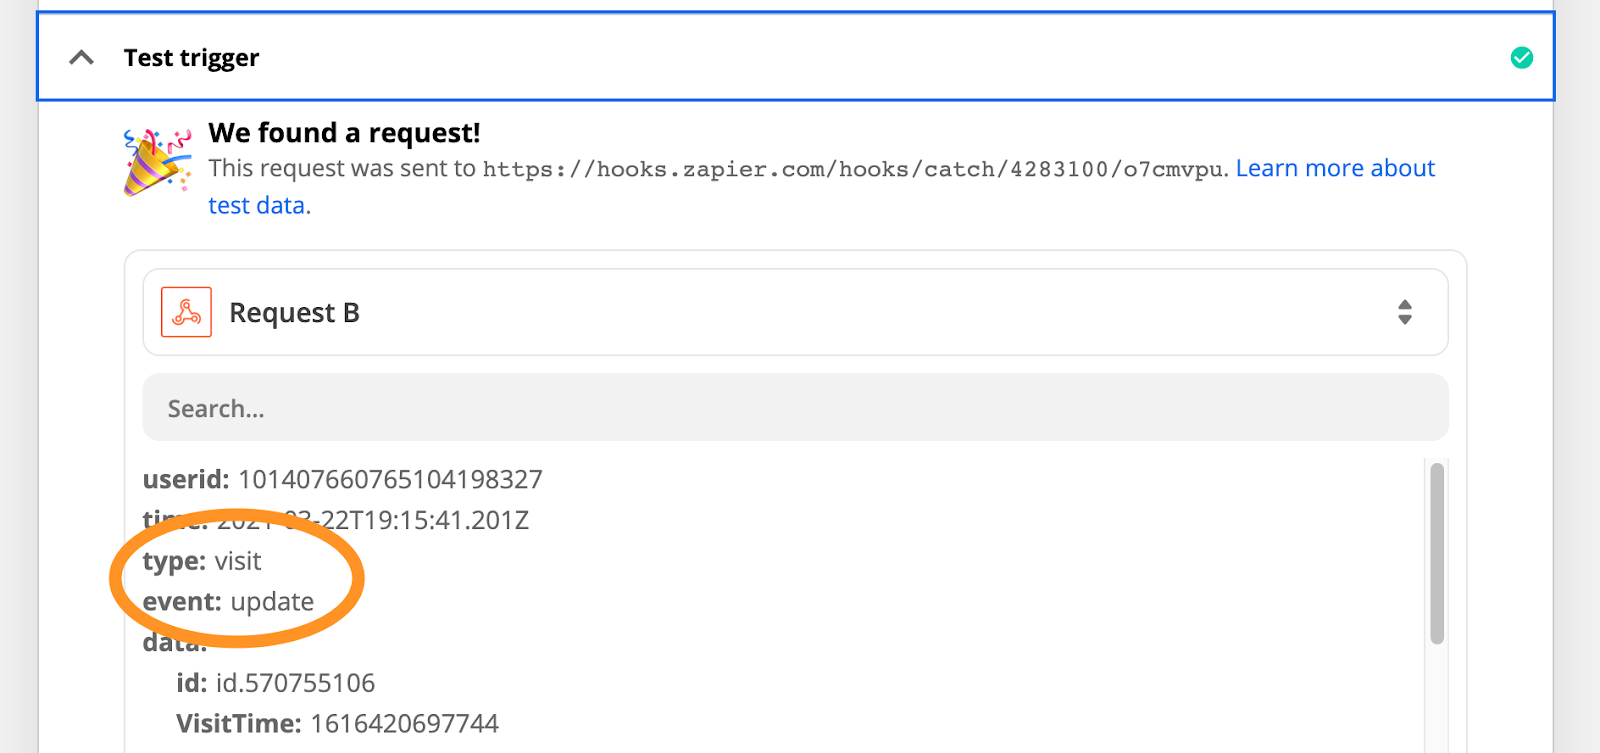
4. Test your webhook and make sure you have selected “visit” as a type of event:
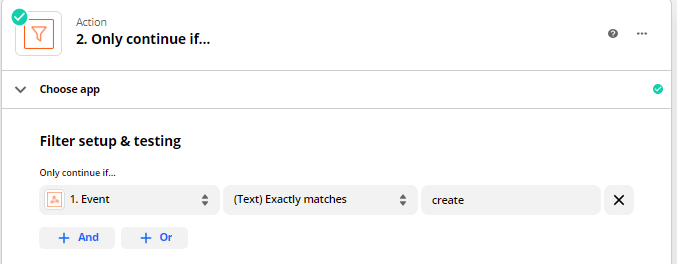
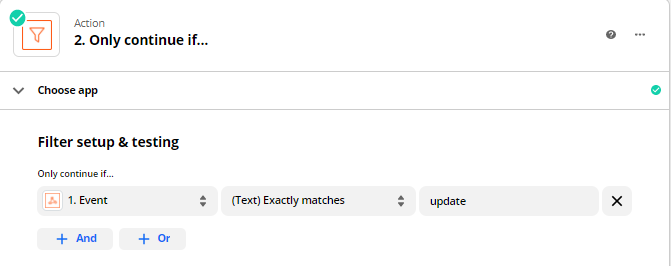
5. Add a “Filter by Zapier” as a second app.
Note: An automated visit will result in two events: 1) for the initial profile view (create event);
2) after the robot opens the contact tab - this will include the email address if the prospect is your 1st-degree connection or you use Dux-Soup points (update event).
Therefore:
If you want to record 2nd and 3rd-degree connections without email, use this filter
If you want to record 1st-degree connections or you use Dux-Soup points, use this filter:
6. Add Salesforce as your action app in Zapier and select an event “Find Record”:
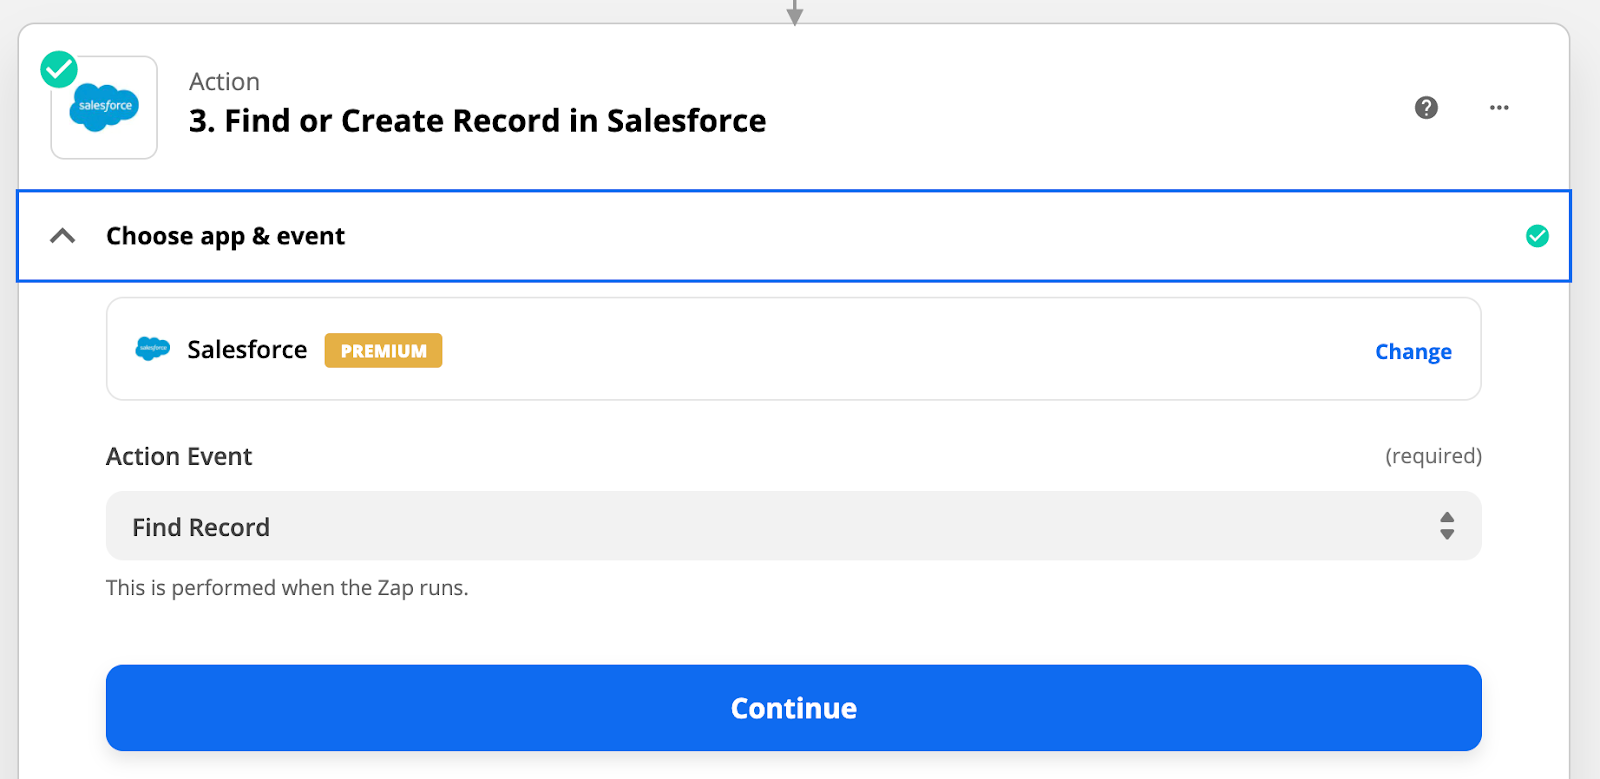
7. Set up your Salesforce account and click on “Continue”
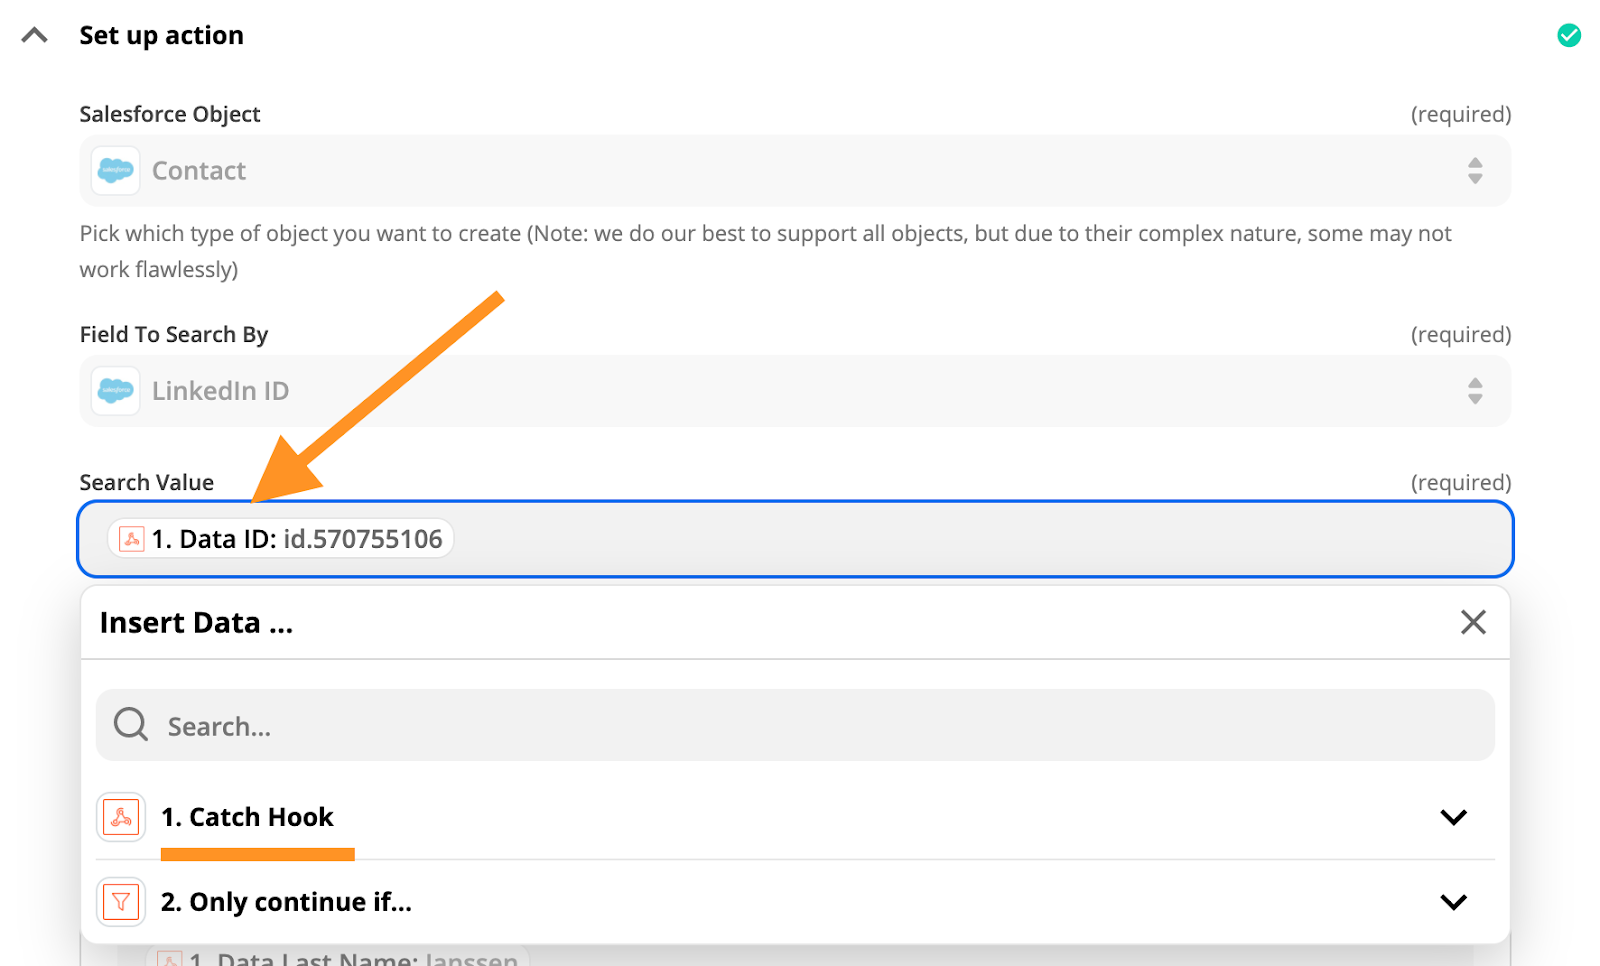
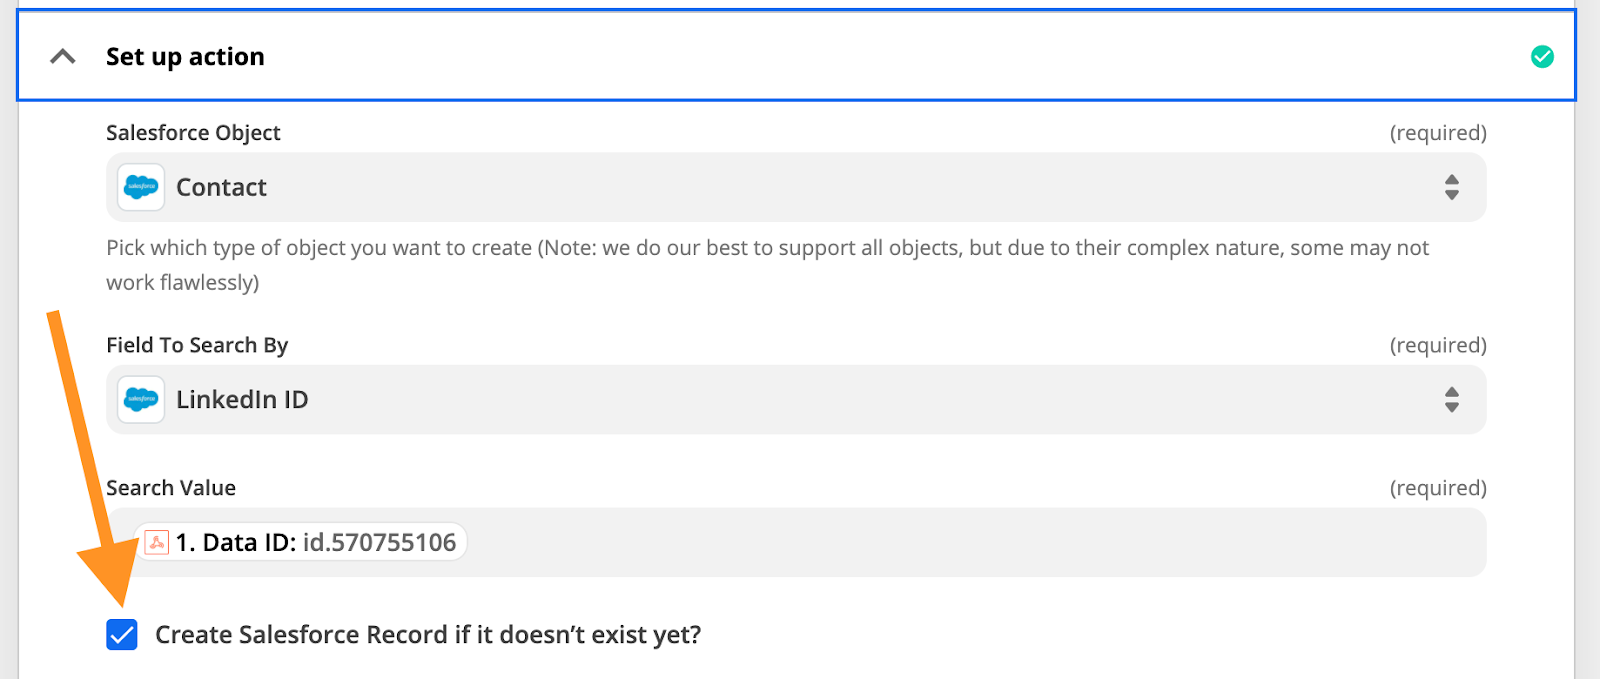
8. Set Up an action, in this case, “Contact” and make sure you fill in Search Value option with Data ID which is found in the Catch Hook option:
Turn on Create Salesforce Record if it doesn’t exist option:
After these steps, add data that you wish Dux-Soup to collect and transfer to your Salesforce account.
9. Test your Zap and turn it on.
You will find your contacts in the Leads tab in Salesforce.
Result:
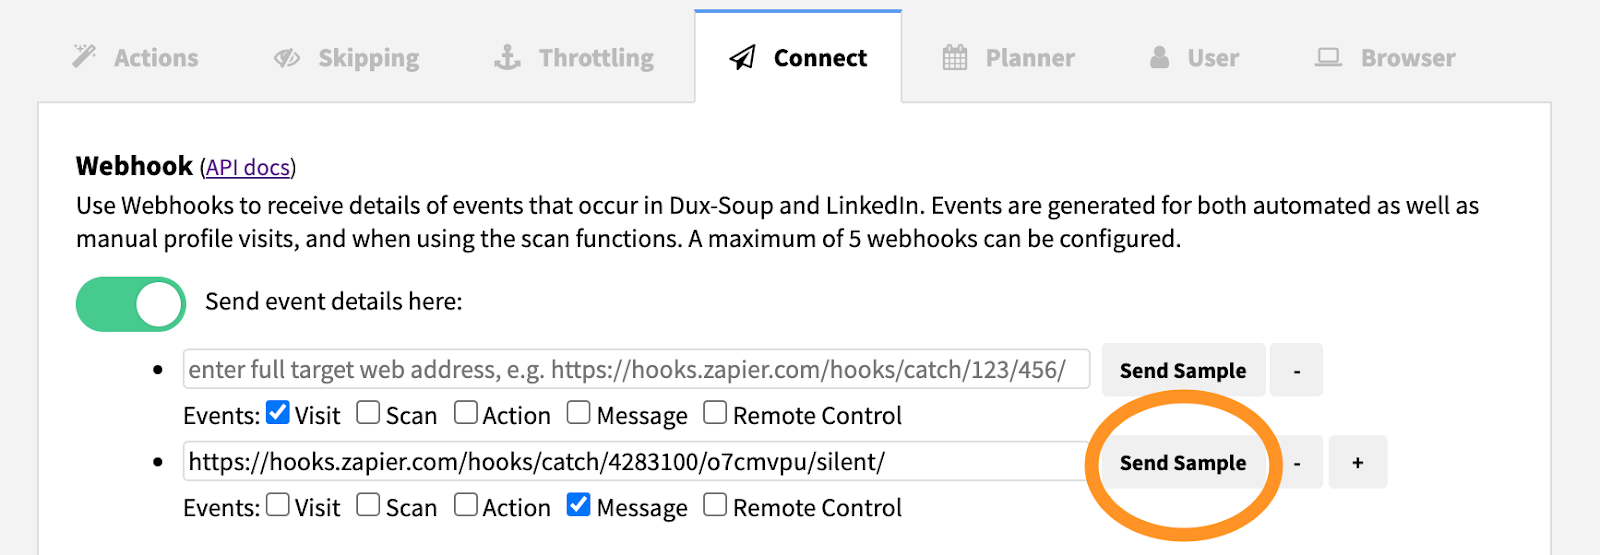
1. Create another Zap, select Webhooks by Zapier as Trigger App and Catch Hook as Trigger Event, copy a new webhook and paste it in the Options, Connect tab (steps 1-2 from the 1st Zap). Make sure you have selected only the Message event, click on Send Sample:
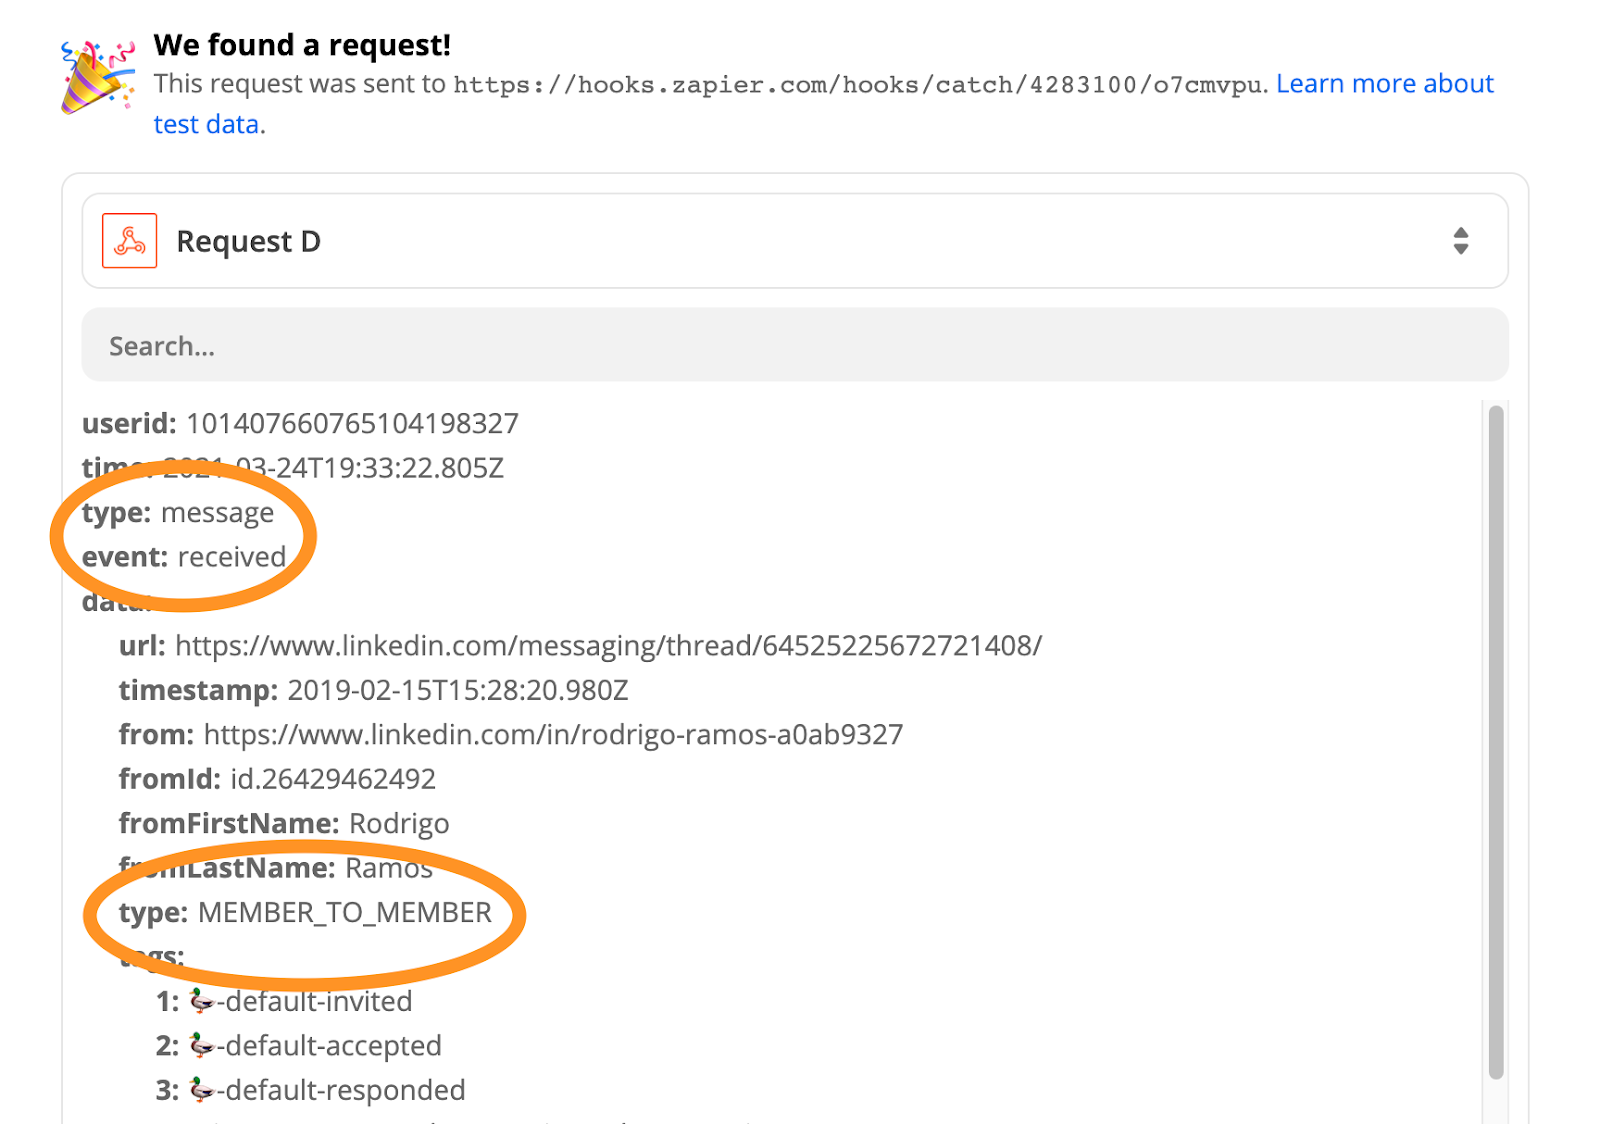
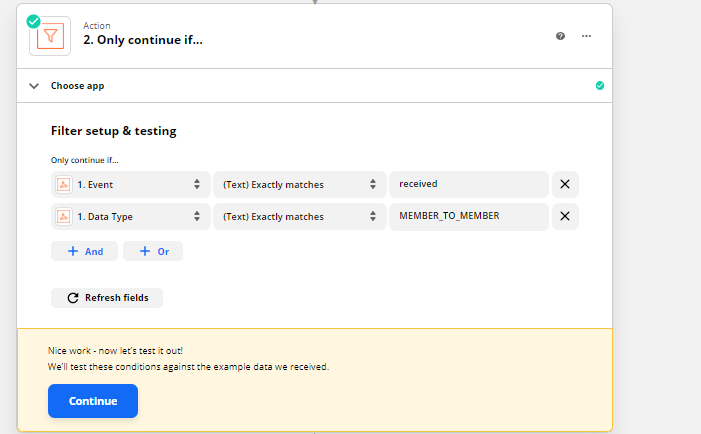
2. Return to Zapier, test your trigger and make sure you have selected MEMBER_TO_MEMBER as an event type:
3. Add “Filter by Zapier as your second app in Zapier and make sure it has the following values:
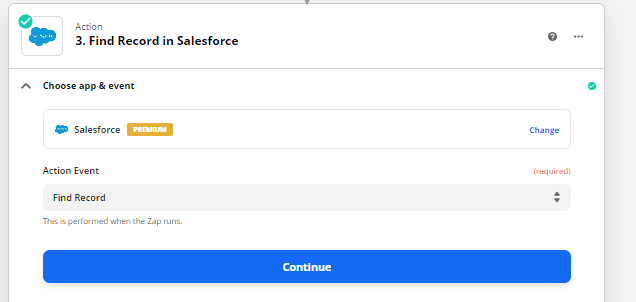
4. Set Salesforce as an action app and “Find Record” as an action event:
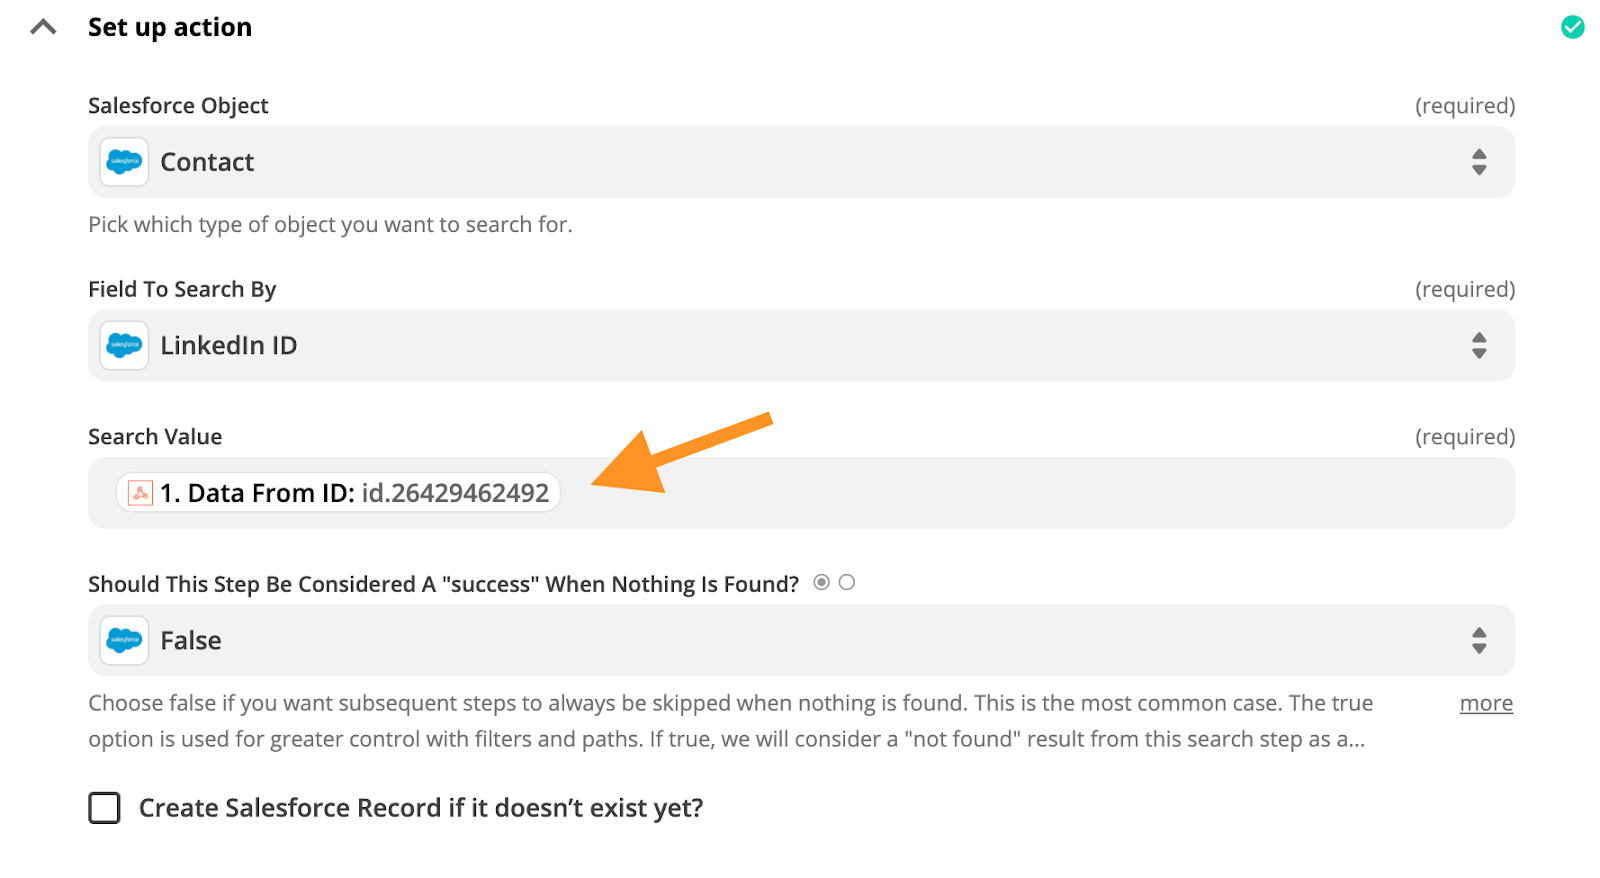
5. Select your account in the next step and set up profile search criteria. Make sure you select Data From ID which is retrieved from a webhook (Catch Hook) in the Search Value field.
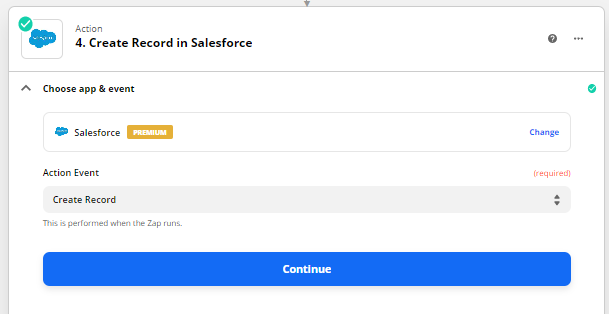
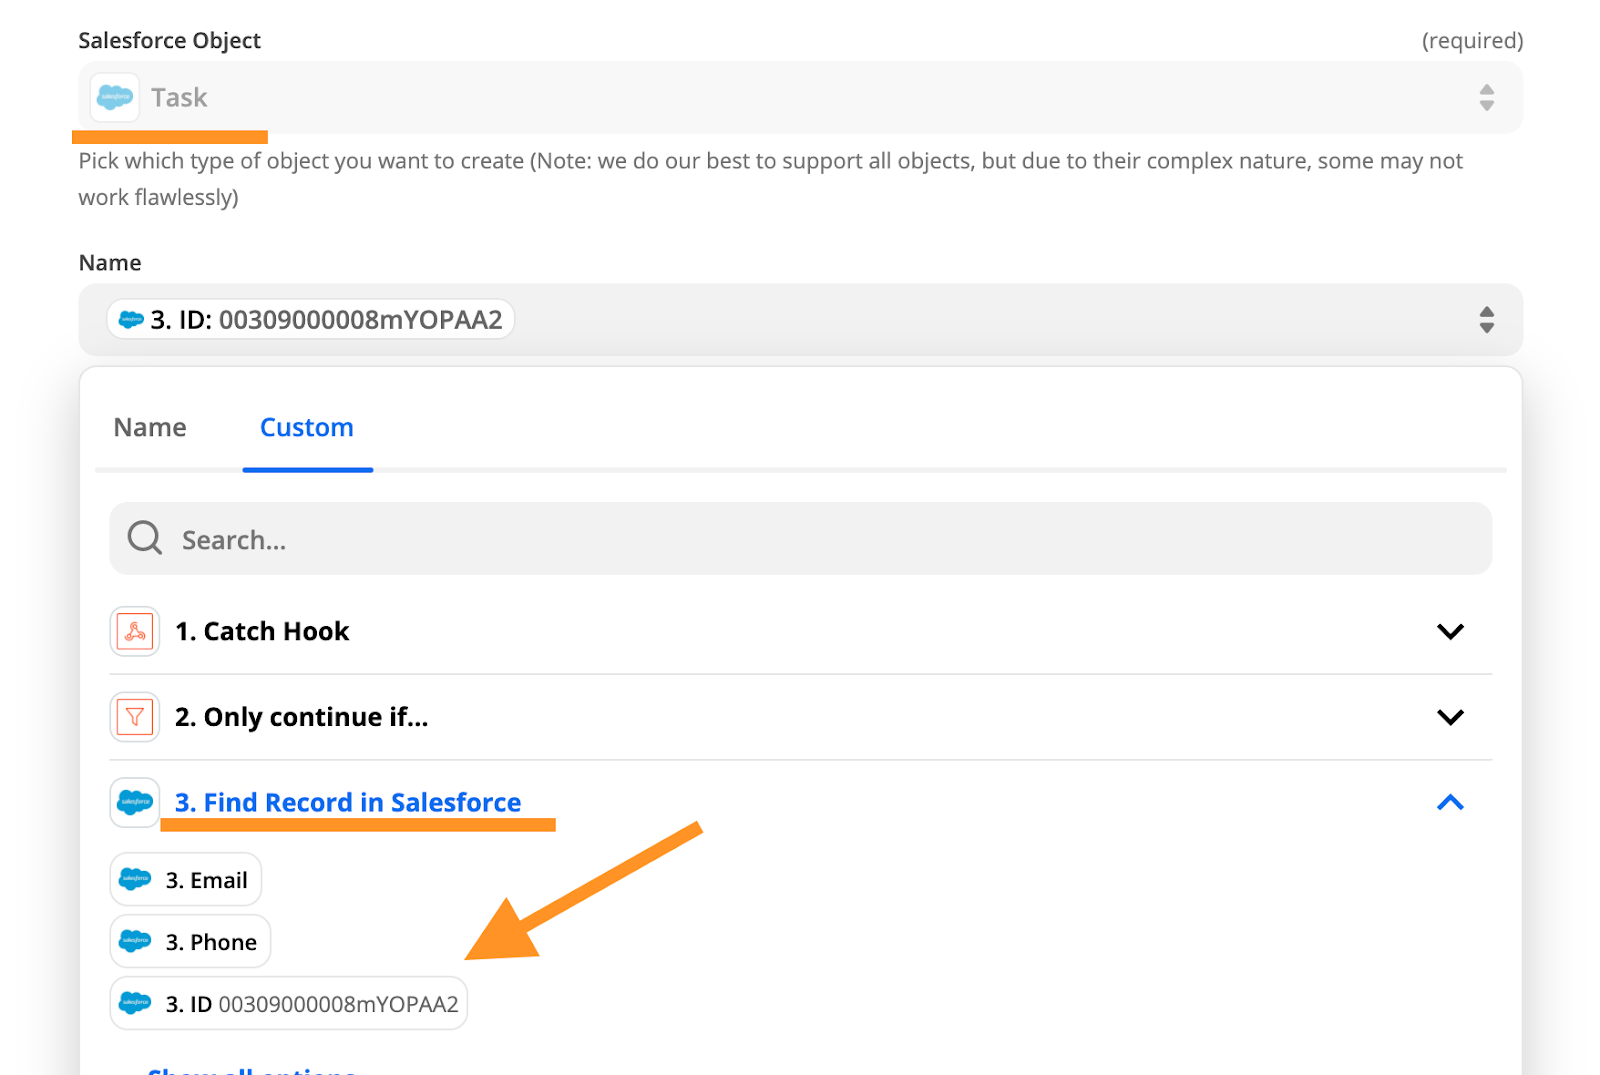
6. Add another Salesforce action app, but at this time, please select “Create Record” as an action event:
7. Choose your Salesforce account and move further to set up a new Task action as Salesforce Object. Make sure you use a Salesforce ID in a name field that can be found in Find Record in Salesforce option.
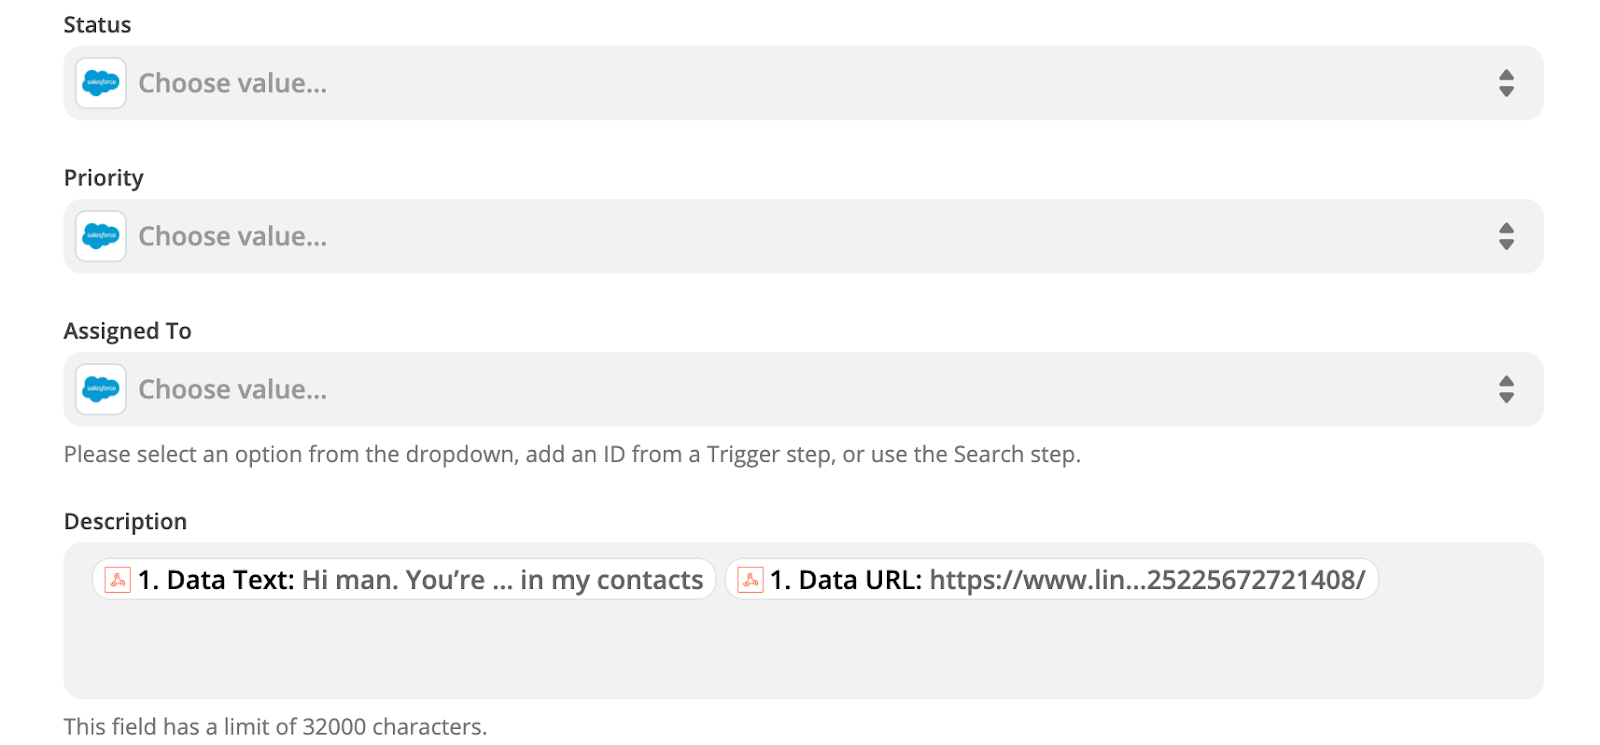
8. Fill in fields as you prefer, once your reach a Description field add Data Text and Data URL to the field:
9. Test your Zap and turn it on.
Results:
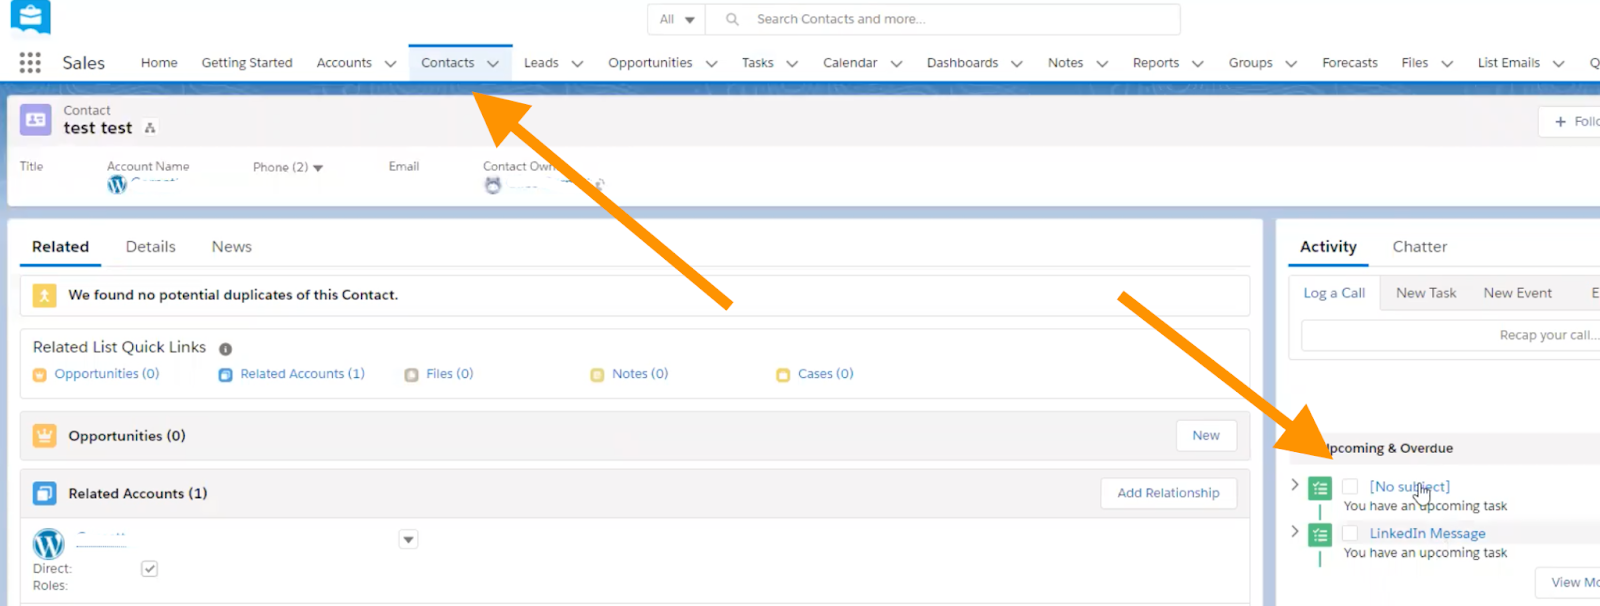
Messages show up as tasks:

Messages show up on individual contact’s page:
1. Before you make another Zap, please enable the Remote Control in Dux-Soup Options, Connect tab:

2. Go back to Zapier and make a new Zap, select Webhooks by Zapier as Trigger App and Catch Hook as Trigger Event, copy a new webhook and paste it in the Options, Connect tab (steps 1-2 from the 1st Zap).
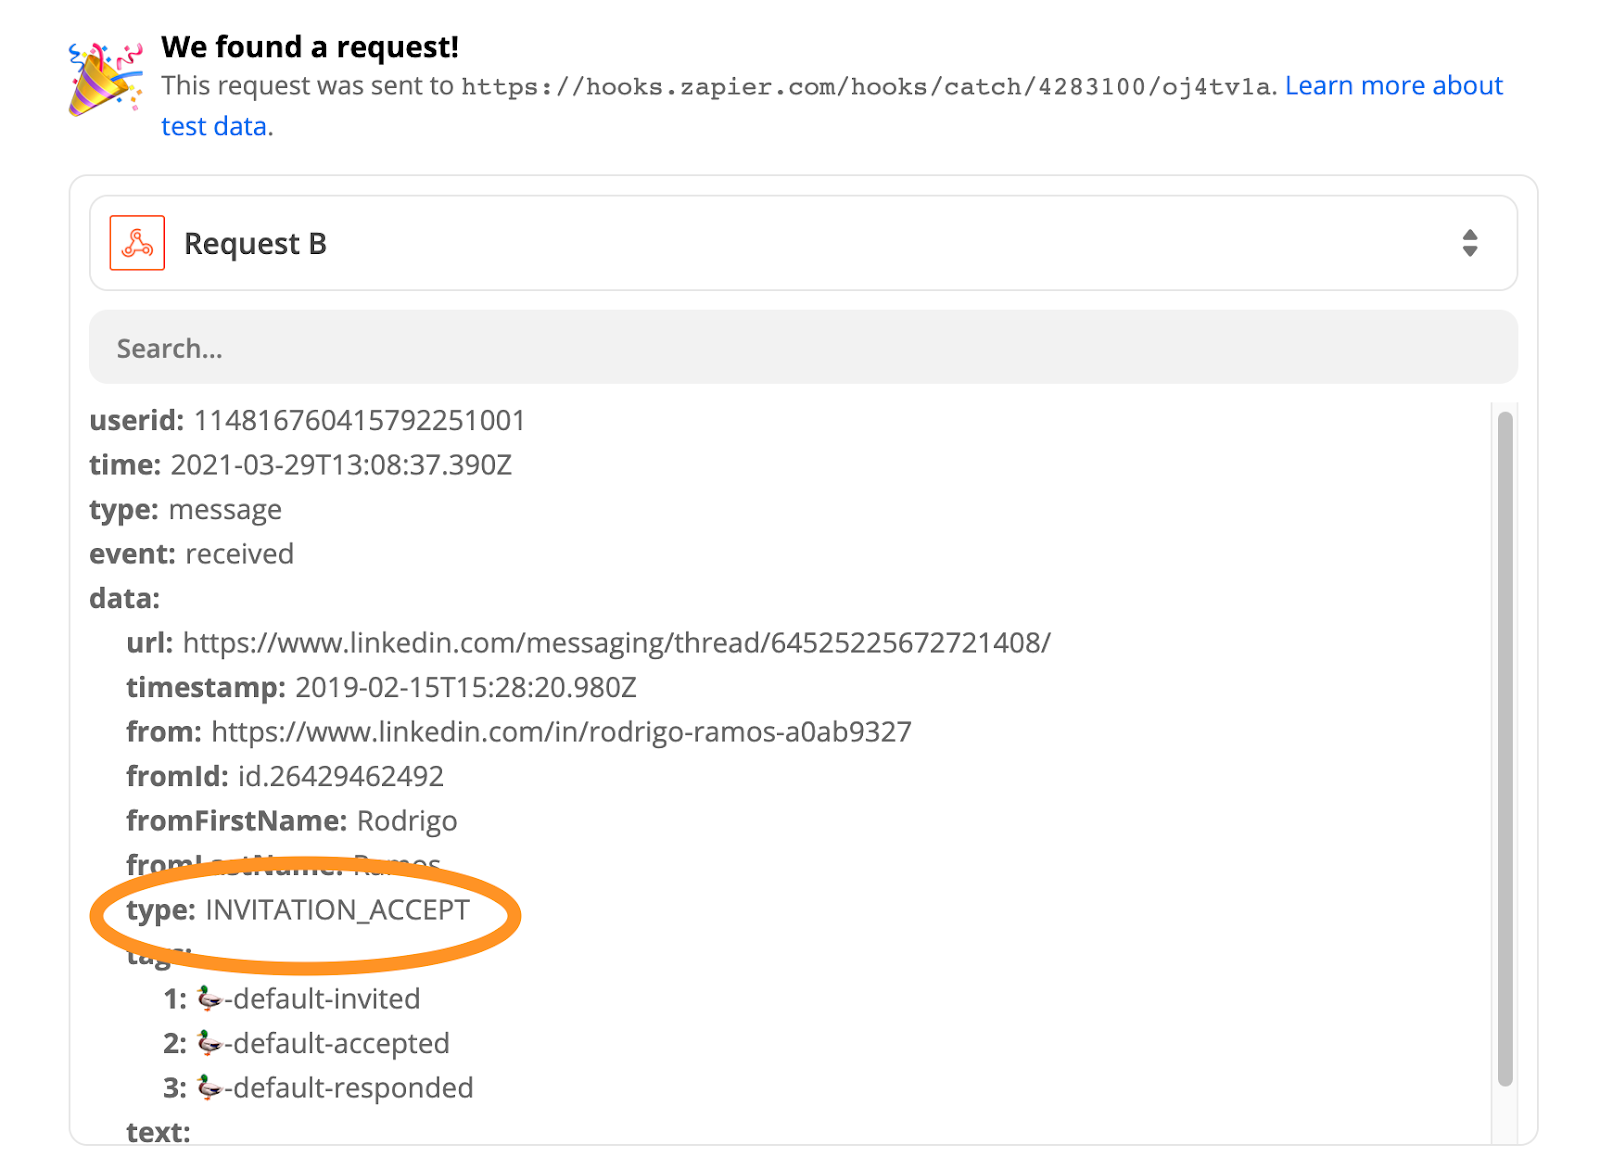
3. Make sure you have selected only the Message event, click on Send Sample:
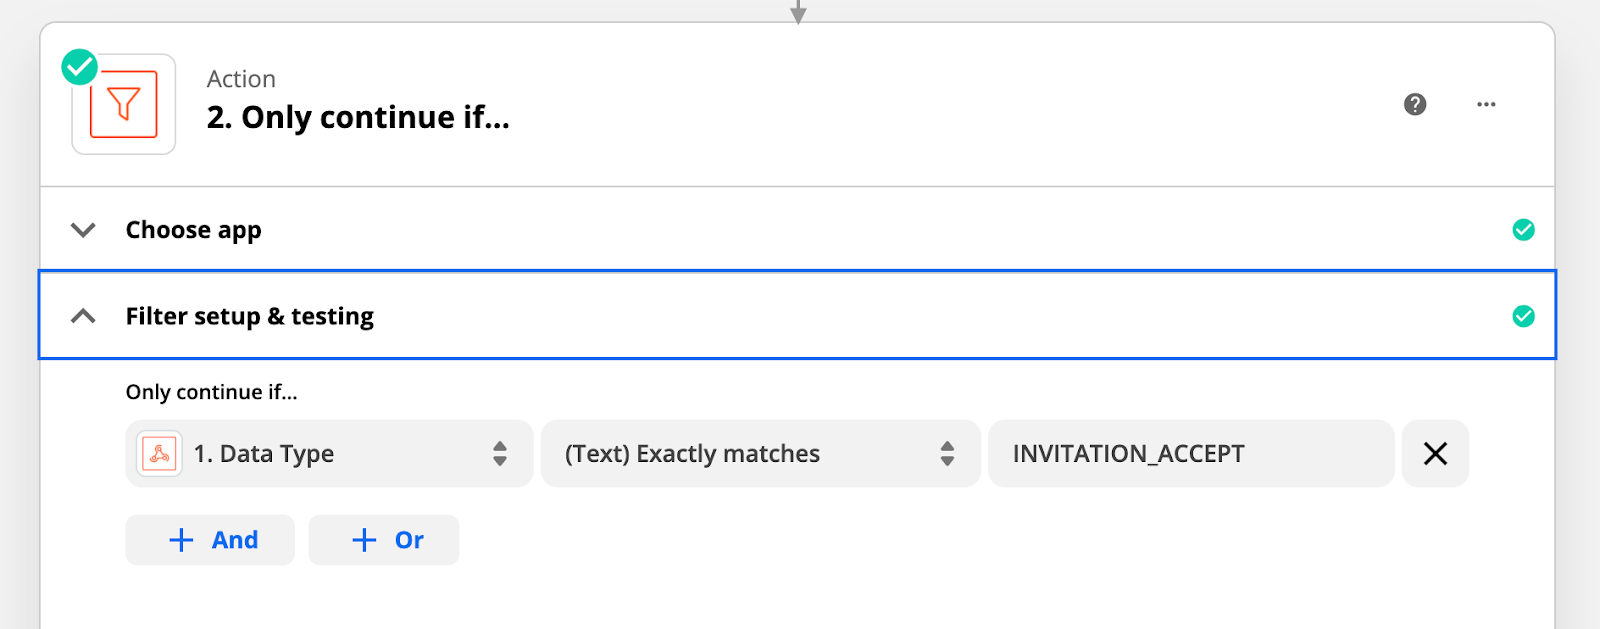
4. Return to Zapier, test your trigger and make sure you have selected INVITATION_ACCEPT as an event type:
5. Add “Filter by Zapier as your second app in Zapier and make sure it has the following values:
6. Add Dux-Soup as an action app and select Visit Profiles as an action event:
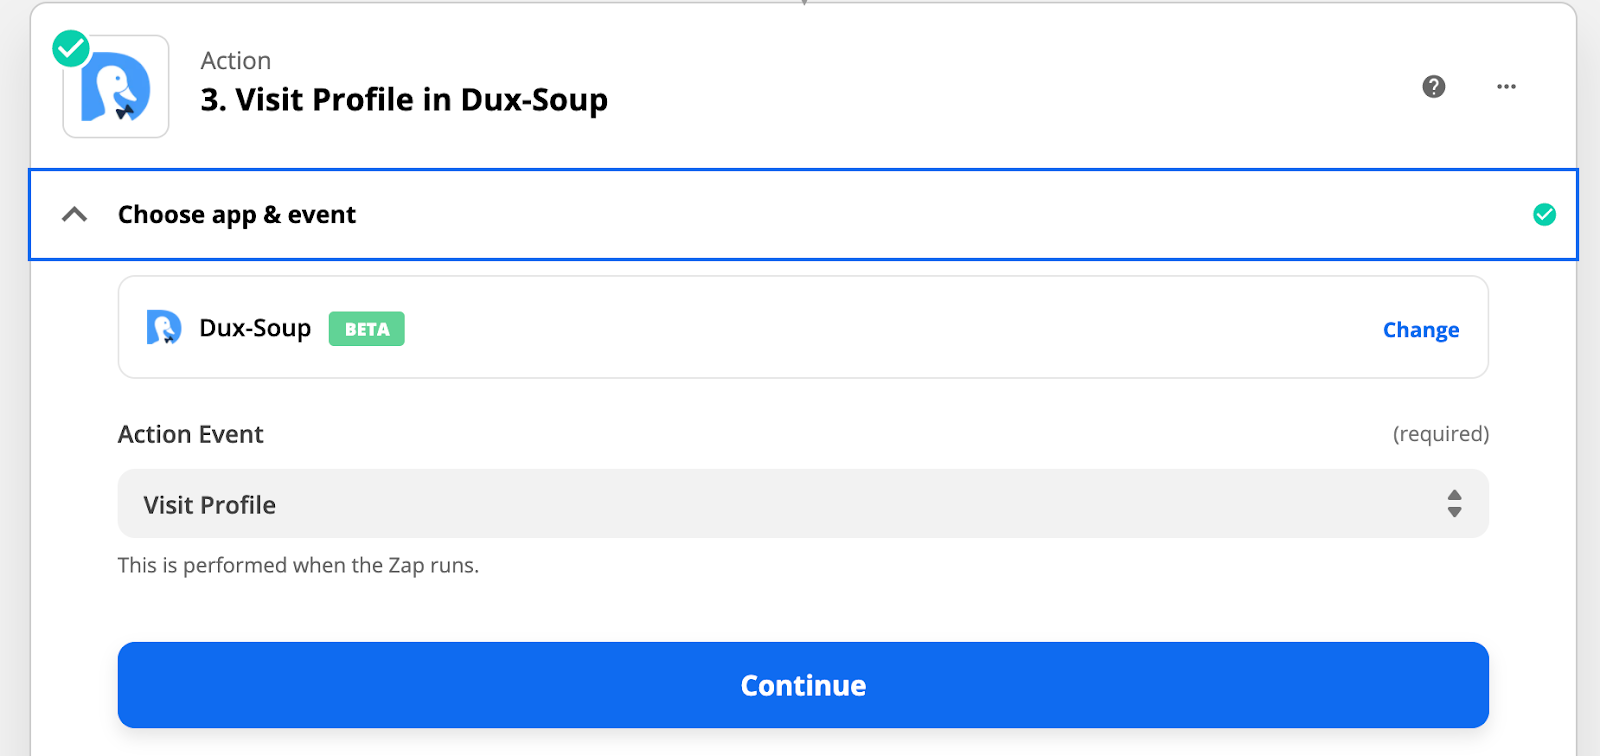
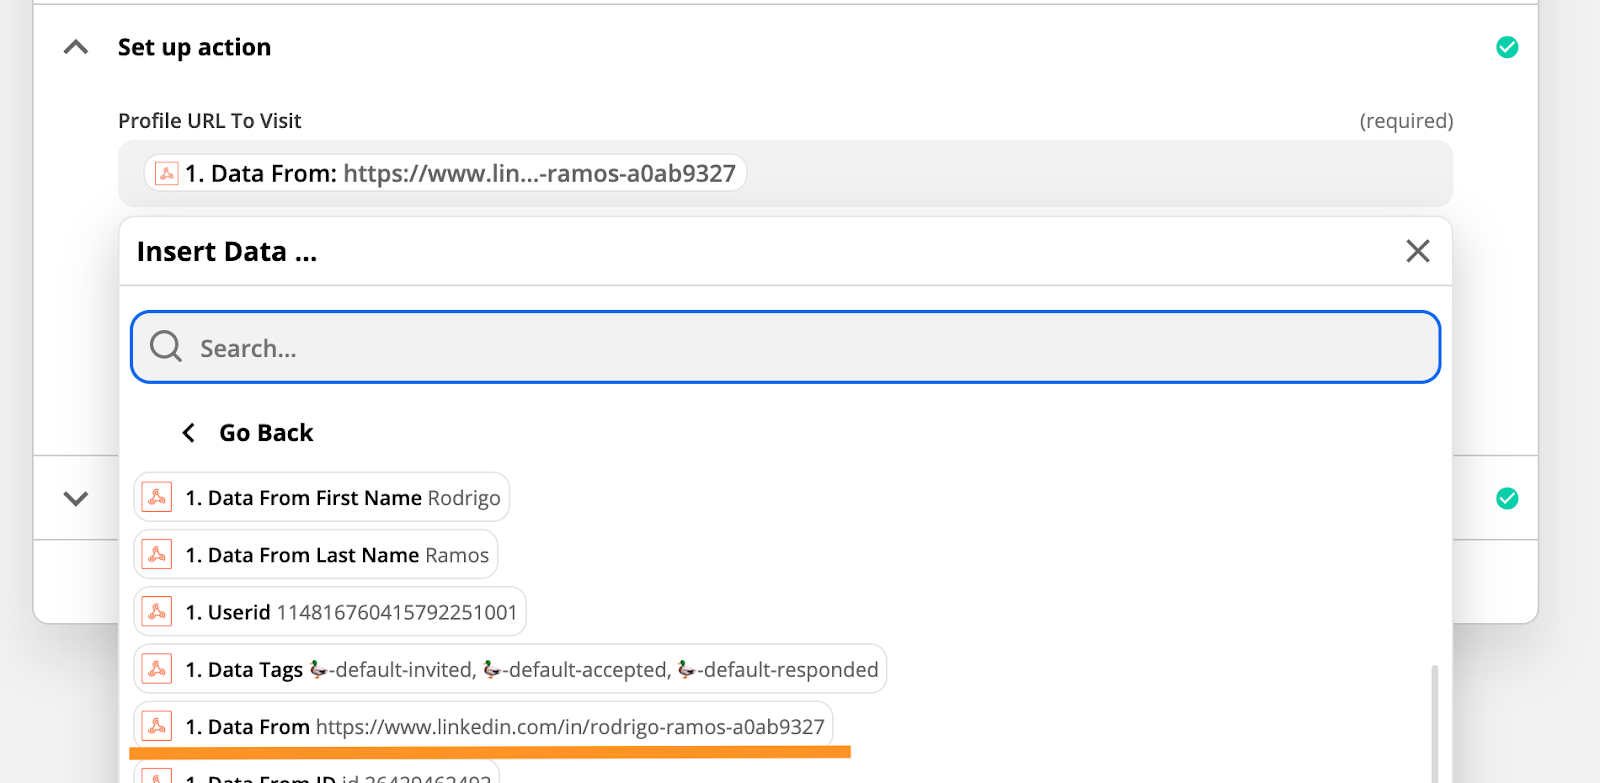
7. Set-up Dux-Soup connection (your API user details are located in the Dux-Soup Options, Connect tab) and set-up action command’s details, make sure you add Data From URL:
8. Turn on your Zap, you should see Dux-Soup opening a new window tab and visiting a profile.
We’ve recorded a practical tutorial to show you all of this in action - so you can create a lead generation powerhouse with Salesforce and Dux-Soup Turbo.
In the video, Giles Garnett, Head of Professional Services at Dux-Soup takes you step by step through the process outlined in the blog.
We’ve shown you how to integrate Dux-Soup Turbo with Salesforce.
Why not Sign up for our blog to immediately receive more LinkedIn tips and tricks as they are published!
If you're not a Dux user and want to explore more then check out our packages and plans. The good news is that Salesforce integration requires our premium Turbo plan, which is handily available on a 7-day free trial - why not try it out today.
Good luck and Happy Dux-ing!
PS: If you’ve got any further questions, feel free to contact Dux-Soup Support at info@dux-soup.com - we always welcome comments, suggestions or feedback.
Handle your entire sales pipeline, track your performances, and in the end, close more deals.
Lorem ipsum dolor sit amet, consectetur adipiscing elit. Suspendisse varius enim in eros elementum tristique. Duis cursus, mi quis viverra ornare, eros dolor interdum nulla, ut commodo diam libero vitae erat. Aenean faucibus nibh et justo cursus id rutrum lorem imperdiet. Nunc ut sem vitae risus tristique posuere.


